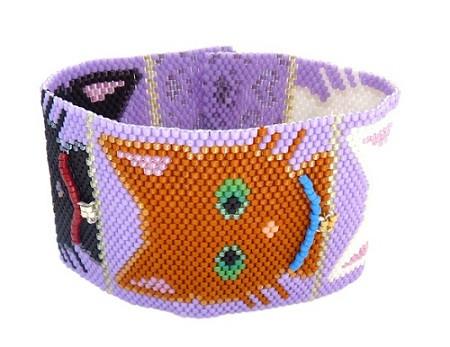
“Pretty Kitties” Cat Collars
Here is a quick tutorial on how I did the cat collar on my “Pretty Kitties” Cuff bracelet.
If you are an experienced beader, you probably don’t even need this guide, as adding collars is very easy. But this will have the bracelet looking exactly like I beaded mine up, if you liked that look. 🙂
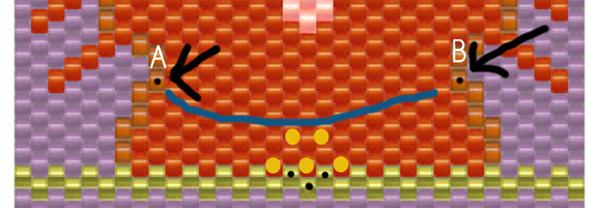
Please refer to pictures below, as following the guide.
 Using a comfortable amount of thread, (about 48 inches or so. Better to have too much than to run out!) bring your needle out of Black Dot “A” (left side).
When first starting, you will need to hold onto your left thread until more secure, or secure your thread by going through a couple beads before going through A, so that your thread is less likely to slip out.
String on 18 size 11 delicas of your color choice. Go through other corresponding black point on opposite side (black dot B) turn your needle and thread around by going through nearby beads while trying not to leave visible thread and come back through B (black dot on right side) and come up the “collar beads”.
Go back through the “collar beads” and all the way through 10 beads. Add 2 metallic size 11 delica beads, go back through beads 9 and 10 (counting from left to right), then back through the two metallic beads.
Add three beads, then go back through the 2 metallic beads you added before. Follow the thread path back to where you first began (A), then turn your needle and thread back around (by going through nearby beads) and come back through A to reinforce your threads. When you get back down to the metallic beads, that is the last three on the “tag” you can sew these three beads into the 903 on the divider line where the 3 black dots are, that way the collar will stay securely sewed to the bead work.
I might not have the exact three beads picked on the divider 903 rows, as I did this tutorial after I beaded it up, but I do know that the bottom of the “tag” fits perfectly sewed into the middle of the divider lines below it. Just line your three beads up with the 903 rows beneath, and sew them together, kinda like you would zip stitch an amulet bag. Only sew the three bottom beads of the tag down, not the entire collar. When tag is secured to bracelet, continue follolwing thread path to finish reinforcing.
That’s it, just remember to reinforce your work, and try not to leave a visible thread path, and all will turn out great.
I hope this was a little helpful. 🙂 I tried to make this as clear as possible, but I know I could have missed something, or perhaps included too much, so that it got confusing.
Let me know if there is something I need to fix. Thanks

